Table of Content
Replacing a washing machine timer restores full functionality when cycles fail to advance or the machine won't start. This DIY repair saves hundreds compared to professional service, often costing $50–$200 for the part alone.
Signs of a Faulty Timer
Common symptoms include the washer refusing to start, the timer dial not advancing during cycles, or the machine stopping mid-wash without completing agitation or spin. These issues stem from worn mechanical contacts, a failing timer motor, or loose wiring inside the control assembly. No advancement often points directly to the timer, as it controls power distribution to the motor, pump, and agitator.
Tools and Materials Needed
Gather these essentials before starting: Phillips and flathead screwdrivers, nut driver (1/4-inch), needle-nose pliers, multimeter for testing, replacement timer matched to your model, gloves, flashlight, and a rag for cleanup. Safety gear like goggles protects against sharp edges or debris. A phone camera documents wire positions to avoid reconnection errors.
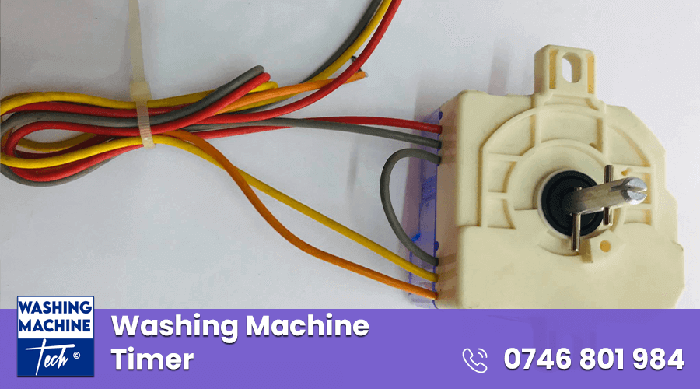
Finding Your Model's Timer
Locate the model number on the back, top edge, or inside the lid of your washer—essential for ordering the exact OEM part from sites like PartSelect or manufacturer pages. Timers vary by brand: GE uses parts like WH12X10348, Whirlpool WP8577356, avoiding universal fits that risk incompatibility. Cross-reference with your service manual for terminal layouts.
Safety Precautions First
Unplug the washer from the wall outlet to eliminate shock risk, then shut off water supply valves behind it. Drain residual water by tilting or using the drain hose into a bucket. Wear gloves to handle components, and avoid forcing parts to prevent damage.
Step-by-Step Disassembly
Access begins at the control console. For top-loaders, remove the detergent dispenser or end caps (one screw each side), then lift the console lid by releasing front clips with a flathead—gently pry without breaking plastic.
Pull the timer knob off by depressing the center clip with needle-nose pliers or pushing firmly while turning counterclockwise; it may require rotating the skirt first. Unscrew 1-2 mounting screws holding the timer to the panel, typically visible now.
Disconnect the wire harness by lifting the locking tab and pulling straight back—note colors and positions via photo. Slide or rotate the timer counterclockwise to release from its shaft, then lift it out.
Diagnosing the Timer
Test continuity with a multimeter set to ohms: probe terminals per the wiring diagram (found in manual or online via model number). No beep or infinite resistance on cycle advance contacts confirms failure. Inspect for burnt spots, corrosion, or seized gears inside if disassembling further—not always fixable.
Installing the New Timer
Align the new timer's shaft with the panel hole, matching orientation to the old one. Secure with original screws, then reconnect the harness—push until the tab clicks, verifying positions match your photo. Rotate clockwise to lock onto the shaft if applicable.
Reassemble the console: lower it, snap clips into slots, and replace end caps or dispenser. Push the knob and skirt back on firmly.
Testing the Repair
Plug in, turn on water, and run a short cycle like "rinse and spin." Monitor for proper advancement, fill, agitation, and drain—listen for unusual noises indicating misalignment. If issues persist, recheck wiring or consider lid switch problems.
Common Brands: GE, Whirlpool, Others
GE models involve tilting the console fully back after end cap screws; use pliers for the knob clip. Whirlpool requires prying a locking tab on the mount plate, sliding forward to release. Speed Queen or commercial units snap in easily but cost more ($250). Always brand-specific for reliability.
Troubleshooting Post-Install Issues
If the timer advances but no agitation, inspect the harness for loose pins or test the motor separately. Water not filling? Check inlet valves, not timer-related. Won't spin? Coupling or transmission likely culprits. Recheck power at the outlet with a tester.
Cost Savings and When to Call Pros
DIY timer swaps cost $50–$250 for the part plus tools you likely own, versus $300–$500 service fees. Pros handle warranties or complex electronics, ideal if under warranty or uncomfortable with wiring. In Kenya, source parts via Jumia or local Repairtech equivalents, comparing Nairobi prices around KSh 5,000–15,000.
Preventive Maintenance Tips
Clean the timer area yearly to prevent dust buildup accelerating wear. Avoid overloading to reduce electrical strain. Lubricate gears lightly if accessible, but replacement beats repeated fixes for 10+ year machines.
Alternatives to Full Replacement
For minor contact issues, clean corroded points with fine sandpaper or electrical cleaner before reassembly—extends life without new parts. Mechanical timers rarely repair fully; digital ones need board-level work, often not DIY.
Opting for a compatible aftermarket timer shaves costs but verify reviews for advance reliability. Upgrading to a smart washer? Factor in $500+ but gain app diagnostics avoiding future timers.
This repair empowers homeowners, especially in service-heavy markets like Nairobi where appliance downtime disrupts routines. With precise steps, most complete it in under an hour, reclaiming laundry efficiency.


