Table of Content
Washing machine belt replacement is a common DIY repair that can restore spin and agitation when your drum stops turning properly. With basic tools and a bit of care you can usually complete the job in under an hour, saving the cost of a service call. Below is a clear, step‑by‑step guide you can follow for most top‑load and front‑load machines, adapted from widely accepted repair practices and manufacturer‑style instructions.
Before you start
Always begin by unplugging the washing machine from the power outlet and, if possible, turning off the nearby circuit breaker so there is no risk of accidental start‑up. If your machine is a front‑loader, you may also have to shut off the water supply and disconnect the hoses at the back, especially if you plan to tilt the unit or work at floor level.
Check the model number (usually on a sticker inside the door, on the rear panel, or under the lid) and source a matching OEM or compatible drive belt; installing the wrong size is a common cause of premature failure or slipping. Gather a screwdriver set, a wrench or nut‑driver as needed, a pair of pliers, and a small container or towel to catch any residual water when handling hoses.
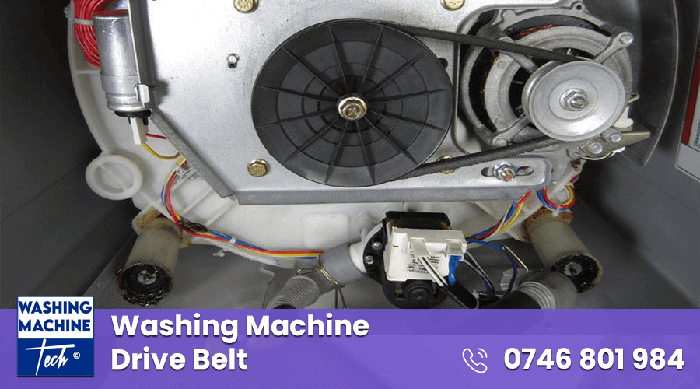
Accessing the drive belt
How you reach the belt depends on whether you have a top‑loader or front‑loader. On many top‑loaders you tilt the machine slightly on its side or at the front so you can see the motor and drum pulley underneath or at the rear base. On most front‑loaders the belt is accessed from the rear panel, which you remove by unscrewing the surrounding screws; some models may require you to remove the top panel first.
With the access panel off, you will see a thick rubber drive belt looping around the motor pulley and the large drum pulley (sometimes via an idler pulley). Take a quick photo or make a mental note of how the belt sits so you can replicate the routing on the new one. If your model has a belt cover or splash guard inside the cabinet, remove or set it aside carefully.
Removing the old belt
Before you pull the old belt off, check if there is a tensioner, idler pulley, or motor‑mounting bolt that keeps the belt tight. Loosen or slightly reposition this tension mechanism so the belt can slip off the pulleys without forcing anything. If the belt has snapped or is badly cracked, you may simply be able to pull it cleanly away.
Working from the motor pulley first, gently rotate the drum by hand while guiding the belt off the motor shaft and then off the drum pulley. For some designs you can also rotate the drum pulley with the belt clamped in pliers, easing the belt off bit by bit until it comes free. Inspect the old belt for fraying, glazing, or exposed fabric; widespread wear can indicate misalignment or bearing issues that may need separate attention.
Installing the new belt
First confirm the orientation of the new belt: the flat side (back) should face outward, and the ribbed or V‑grooved side should sit snugly in the grooves of both pulleys. Slip the new belt over the motor pulley first, then guide it toward the drum pulley. Many technicians recommend putting the belt onto the smaller motor pulley and then easing it onto one side of the large drum pulley, rotating the drum slowly so the belt tracks fully into the groove.
Once the belt is seated correctly on both pulleys, rotate the drum by hand to check that it turns smoothly without catching or jumping off. If your machine has an idler or tensioner, now is the time to adjust it so the belt has firm but not excessive tension—there should be a small amount of give when you press the belt with your thumb, but it should not sag or slip under load.
Re‑assembling and testing
Re‑attach any belt cover or splash guard in the same position as before, then refit the access panel (rear or base) and secure all screws or clips. If you disconnected the water hoses, reconnect them firmly and briefly turn the water back on to check for drips; tighten the couplings if needed.
Restore power, run the machine empty on a short spin or rinse cycle, and watch for unusual noises or vibrations. The drum should spin up steadily and then slow down as expected; if the belt slips, screeches, or the drum won’t spin, you may need to re‑check tension, belt seating, or alignment. If the fault persists, it may point to worn motor brushes, failing bearings, or a slipping clutch, which should be evaluated by a qualified technician.
With the belt correctly replaced and tensioned, your washing machine should regain normal spin performance and get back to handling everyday loads without the drum stalling mid‑cycle


