Table of Content
Learn the step-by-step process of washing machine plumbing to ensure proper installation and prevent leaks, clogs, and water damage.
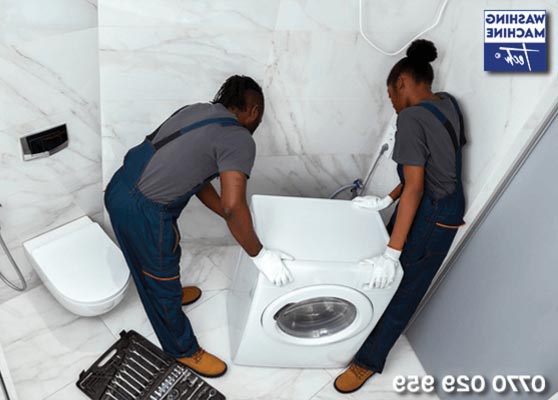
Step By Step Process of Washing Machine Plumbing
Is your washing machine not draining properly? Are you experiencing leaks or strange noises during the wash cycle? These issues often stem from improper washing machine plumbing. Whether you’re installing a new machine or troubleshooting an existing one, understanding the step-by-step process of washing machine plumbing is essential for preventing water damage and ensuring optimal performance.
In this guide, we’ll walk you through the entire process—from preparation to post-installation checks—so you can confidently handle your washing machine plumbing like a pro. By following these steps, you’ll not only save time and money but also extend the lifespan of your appliance.
Why Proper Washing Machine Plumbing Matters
Before diving into the steps, it’s important to understand why washing machine plumbing is so critical:
- Prevents Leaks: Improperly connected hoses or loose fittings can lead to water leaks, causing damage to floors, walls, and even your home’s foundation.
- Ensures Efficiency: A well-plumbed washing machine operates more efficiently, using less water and energy.
- Avoids Clogs: Proper drainage prevents clogs in your plumbing system, reducing the risk of backups and costly repairs.
- Extends Appliance Life: Correct installation reduces strain on the machine, preventing premature wear and tear.
By mastering the step-by-step process of washing machine plumbing, you ensure your appliance runs smoothly and reliably for years to come.
Step 1: Gather the Right Tools and Materials
Before you begin, make sure you have all the necessary tools and materials for washing machine plumbing:
Tools Required:
- Adjustable wrench
- Pipe wrench
- Screwdriver (Phillips and flathead)
- Pliers
- Plumber’s tape (Teflon tape)
- Level
- Measuring tape
- Bucket (for catching water)
- Utility knife
Materials Required:
- Washing machine hoses (hot and cold water supply)
- Drain hose
- Hose clamps
- Water supply valves (if not already installed)
- Drain pipe adapter (if needed)
- Silicone sealant (for sealing gaps)
Having the right tools ensures you can complete the washing machine plumbing process without unnecessary delays or complications.
Step 2: Prepare the Installation Area
Proper preparation is key to successful washing machine plumbing. Follow these steps:
1. Clear the Space
- Remove any items around the washing machine area to create a clear workspace.
- Ensure the floor is clean, dry, and level.
2. Check the Water Supply
- Locate the water supply valves for hot and cold water. If they’re not already installed, you’ll need to install them before proceeding with the washing machine plumbing.
- Turn off the main water supply to avoid accidental flooding during installation.
3. Position the Washing Machine
- Place the washing machine in its designated spot. Ensure there’s enough space for the hoses and drainage.
- Use a level to check that the machine is perfectly horizontal. Adjust the feet if necessary to prevent vibration and noise during operation.
A well-prepared area sets the stage for a smooth washing machine plumbing process.
Step 3: Connect the Water Supply Hoses
The next step in washing machine plumbing is connecting the water supply hoses:
1. Attach the Hoses to the Machine
- Locate the hot and cold water inlet valves on the back of the washing machine.
- Connect the corresponding hoses (hot to hot, cold to cold) to the valves. Hand-tighten the connections first, then use an adjustable wrench to secure them snugly.
2. Connect the Other End to the Supply Valves
- Attach the other end of each hose to the water supply valves. Again, hand-tighten first, then use a wrench to ensure a tight seal.
- Wrap plumber’s tape around the threaded connections to prevent leaks.
3. Test for Leaks
- Turn the water supply valves back on and check for any leaks around the connections. If you notice drips, tighten the fittings further or reapply plumber’s tape.
Properly connecting the water supply hoses is a critical part of the washing machine plumbing process, ensuring your machine receives the correct water flow.
Step 4: Install the Drain Hose
The drain hose is just as important as the water supply hoses in washing machine plumbing:
1. Position the Drain Hose
- The drain hose should be directed to a drain pipe, standpipe, or laundry tub. It should not be kinked or bent, as this can restrict water flow.
- If using a standpipe, ensure it’s at least 30 inches above the floor to prevent backflow.
2. Secure the Hose
- Use a hose clamp to secure the drain hose to the drain pipe or standpipe. This prevents the hose from popping off during the spin cycle.
3. Check the Drain Height
- The drain hose should be no higher than 8 feet above the floor. If it’s too high, the washing machine may struggle to pump out water effectively.
A properly installed drain hose is essential for efficient washing machine plumbing, preventing water from backing up into the machine.
Step 5: Level the Washing Machine
An unlevel washing machine can cause excessive vibration, noise, and even damage to the appliance. Here’s how to level it:
1. Use a Level
- Place a level on top of the washing machine. Adjust the front feet until the machine is perfectly level.
2. Check All Sides
- Rotate the machine 90 degrees and check the level again. Repeat until the machine is balanced in all directions.
3. Tighten the Feet
- Once the machine is level, tighten the locking nuts on the feet to secure them in place.
Proper leveling is a crucial step in washing machine plumbing, ensuring smooth operation and preventing damage.
Step 6: Seal Gaps and Test the System
Before running your first load, complete these final steps in your washing machine plumbing process:
1. Seal Gaps
- Use silicone sealant to seal any gaps between the washing machine and the wall or floor. This prevents water from seeping into hidden areas.
2. Run a Test Cycle
- Start a short wash cycle with no clothes to test the water supply and drainage. Listen for unusual noises and check for leaks.
3. Inspect the Connections
- After the cycle, inspect all hoses and connections for signs of leaks or loosening. Tighten or adjust as needed.
Testing the system ensures that your washing machine plumbing is working correctly and safely.
Common Mistakes to Avoid in Washing Machine Plumbing
Even with the best intentions, mistakes can happen. Avoid these common pitfalls during your washing machine plumbing process:
- Over-tightening Hoses: While it’s important to secure connections, over-tightening can damage the hoses or fittings.
- Ignoring the Level: An unlevel machine can cause vibration and noise, leading to premature wear.
- Kinking the Drain Hose: A kinked hose restricts water flow, causing drainage issues.
- Skipping the Leak Test: Always test for leaks after installation to catch problems early.
By avoiding these mistakes, you’ll ensure a successful washing machine plumbing process every time.
Maintenance Tips for Long-Term Washing Machine Plumbing
To keep your washing machine plumbing in top condition, follow these maintenance tips:
- Inspect Hoses Regularly: Check hoses for cracks, bulges, or leaks every 6 months. Replace them if necessary.
- Clean the Drain Pump: Remove debris from the drain pump filter to prevent clogs.
- Use the Right Detergent: Avoid using too much detergent, as it can cause buildup in the plumbing system.
- Check the Drain Line: Ensure the drain line is clear and free of obstructions.
Regular maintenance extends the life of your washing machine and prevents plumbing issues.
When to Call a Professional for Washing Machine Plumbing
While many washing machine plumbing tasks can be done DIY, some situations require a professional:
- Persistent Leaks: If you’ve tried tightening connections and the leak persists, a professional can identify the root cause.
- Complex Plumbing Issues: If your home’s plumbing system is outdated or complicated, a plumber can ensure proper installation.
- Drainage Problems: If water backs up into the machine or drains slowly, a professional can diagnose and fix the issue.
Knowing when to call a professional saves time, money, and potential water damage.
Conclusion: Mastering Washing Machine Plumbing
Washing machine plumbing might seem daunting, but by following this step-by-step guide, you can confidently install or troubleshoot your appliance. Proper washing machine plumbing ensures efficiency, prevents leaks, and extends the life of your machine.
Remember, the key steps are:
- Gather the right tools and materials.
- Prepare the installation area.
- Connect the water supply hoses.
- Install the drain hose.
- Level the washing machine.
- Seal gaps and test the system.
By avoiding common mistakes and performing regular maintenance, you’ll keep your washing machine running smoothly for years to come.
Have you encountered any issues with your washing machine plumbing? Share your experiences or questions in the comments below!
Need Expert Help?
For professional washing machine plumbing services, contact [Washing Machines Tech]. Our team of experts is ready to assist you with all your washing machine needs.
Disclaimer: Always follow the manufacturer’s guidelines for installation and maintenance. If in doubt, consult a professional plumber.